TL;DR
Moving your rig into a closet or separate room is the most effective way to reduce noise. Proper placement and ventilation are key—foam and treatment alone won’t cut it. Use these strategies to get the best sound and keep your hardware cool. For more on acoustic strategies, see Acoustic Dampening, Placement, and the ‘Rig in the Closet’ Setup.
Imagine recording vocals or running a high-powered AI rig in a tiny closet. The noise can be deafening, and the heat can turn your space into a sauna. Yet, the biggest wins in noise reduction often come from something surprisingly simple: moving your rig out of your workspace entirely.
If you think foam panels are your magic bullet, think again. The real secret to a quiet, cool, and effective closet rig is smart placement combined with basic acoustic strategies. This guide walks you through the most practical, effective ways to tame noise, manage heat, and make your closet work for your setup. For additional tips on home modifications, visit Comfort Life.
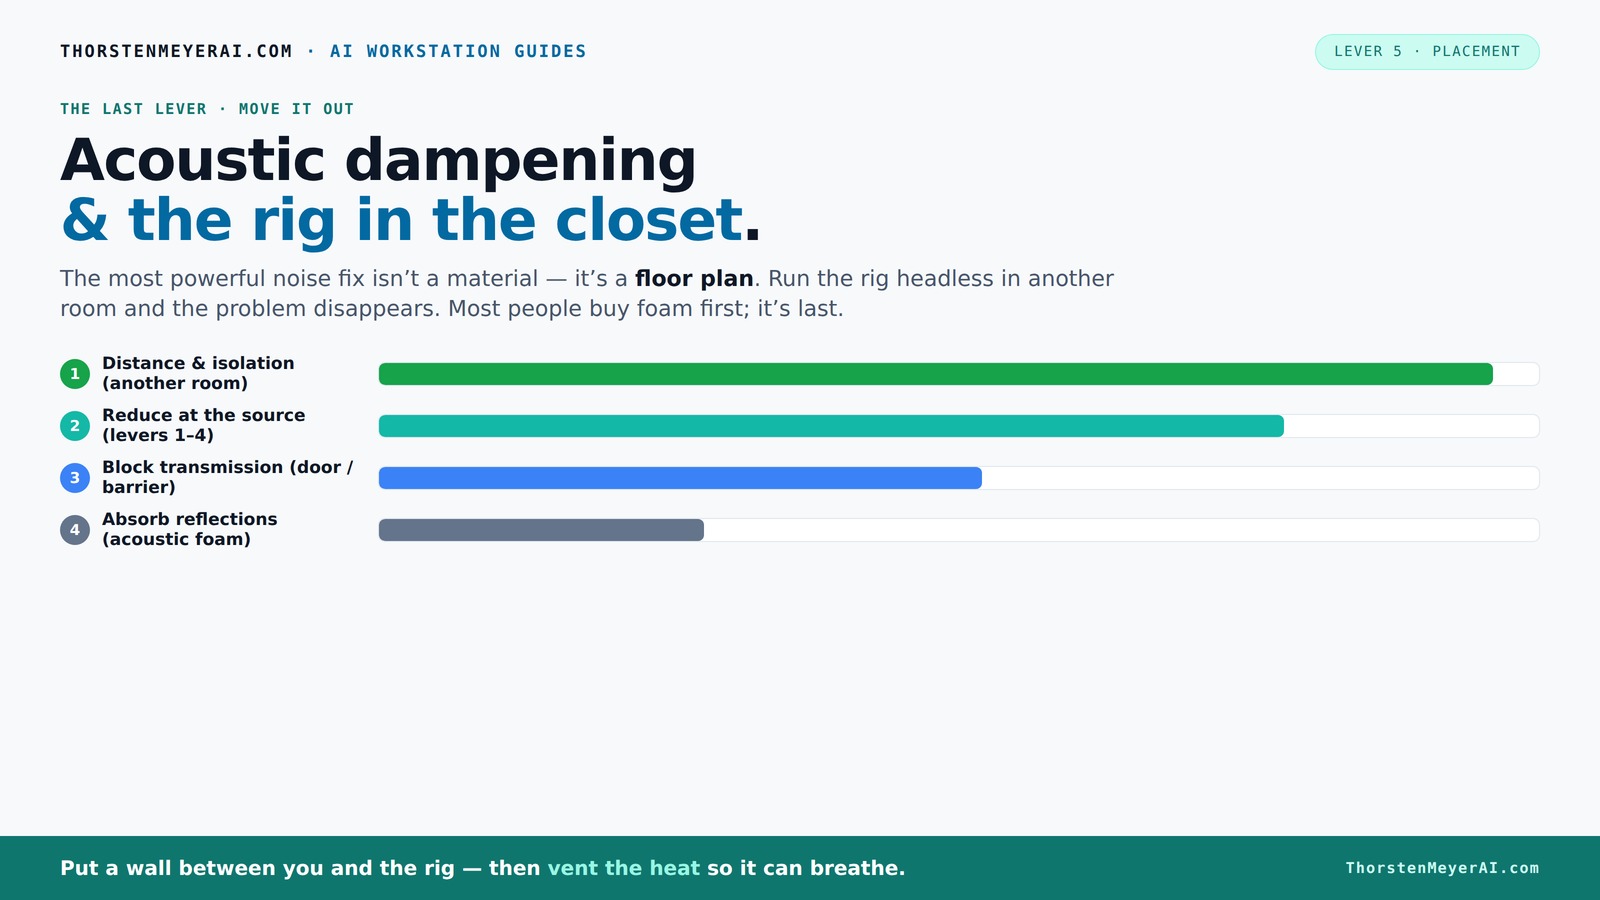
Acoustic dampening
& the rig in the closet.
The most powerful noise fix isn’t a material — it’s a floor plan. A rig you can’t hear because it’s in another room beats any amount of foam. Tap the approaches in Part 1 to see what actually works.
(another room)
(levers 1–4)
(door / barrier)
(acoustic foam)
Contain the noise, not the heat
Key Takeaways
- Moving your rig into a separate room or closet drastically reduces noise and heat issues.
- Ventilation is essential when placing a hot, high-power machine in an enclosed space.
- Acoustic panels improve sound quality but don’t block noise; sealing gaps is crucial for soundproofing.
- Placement of acoustic treatment matters more than the quantity; target reflection points first.
- Don’t neglect the door, floor, and gaps — these are the weak spots that leak sound.

AmazingSpark 1 Pcs 48" X 6' Soundproof Room Divider Panel, Foldable Acoustic Partition Wall with Stand and Straps, Freestanding Privacy Screen for Office Study Bedroom Studio Library (Grey)
Soundproofing & Privacy:our acoustic room divider panel is crafted with acoustic foam and felt to help reduce noise...
As an affiliate, we earn on qualifying purchases.
As an affiliate, we earn on qualifying purchases.
Why Distance Is Your Best Weapon Against Noise
Distance is the simplest, most effective way to cut noise. When your rig is miles away, the sound waves weaken significantly, reducing the perceived volume and impact of the noise. This isn't just about making noise quieter; it's about removing the source from your immediate environment, which often yields the most noticeable improvements with minimal effort.
For example, a friend set up a GPU-heavy AI workstation in his basement closet. He logs in over SSH, and his workspace stays silent. The reason is that sound waves must travel through walls, air, and insulation, losing energy along the way. This method often surpasses the effectiveness of foam panels or noise-canceling headphones because it tackles the problem at its root: the physical proximity of the noise source.
However, this approach requires reliable network connections and proper ventilation to ensure the machine stays cool. The tradeoff is that you need to plan for routing cables and airflow, but the payoff is a dramatically quieter environment.

Focusound 52 Pack Acoustic Foam Panels 1" x 12" x 12" Sound Proof Foam Panles Soundproofing Noise Cancelling Wedge Panels for Home Office Recoding Studio with 300PCS Double-Side Adhesive
Soundproofing - Acoustic foam panels triangular grooves structure for better noise absorption, helps to reduce and absorb unwanted...
As an affiliate, we earn on qualifying purchases.
As an affiliate, we earn on qualifying purchases.
The 'Rig in the Closet' Setup — How to Do It Without Melting Your Machine
Placing a hot, powerful rig inside a closet might seem convenient, but heat buildup is a serious concern. Without proper ventilation, the enclosed space traps heat, causing temperatures to soar and risking hardware damage or thermal throttling. A GPU pushing 600W generates enough heat to turn a closet into a mini sauna, which can reduce performance and shorten component lifespan.
The key is effective ventilation. Passive vents alone may not suffice, especially in small spaces. Installing an exhaust fan that actively pulls hot air out and introduces cooler air is essential. Many DIY enthusiasts use a duct system with a quiet fan to maintain airflow without adding noise. This setup ensures that heat is expelled efficiently while keeping noise levels manageable, preventing thermal issues that could lead to crashes or hardware failure. For more on cooling options, check out this guide on liquid vs. air cooling.
Some opt for purpose-built soundproof cabinets with integrated cooling. These units combine acoustic treatment with temperature regulation, but they come at a higher cost. The fundamental takeaway is that without proper airflow management, your rig’s performance and longevity are at risk. Ventilation isn't just a best practice; it's a necessity for safe, reliable operation in a small, enclosed space.
For more on cooling options, check out this guide on [liquid vs. air cooling](https://thorstenmeyerai.com/liquid-vs-air-cooling-inference-rig/).
be quiet! Pure Base 501 Black ATX Case | 2 Preinstalled Pure Wings 3 140mm PWM Fans | Optimized Air Pressure | Compact PC Case | Vertical GPU Installation | USB 3.2 Gen. 2 Type C | BG073
Without any distractions, Pure Base 501 is reduced to excel at its core functions and is aimed at...
As an affiliate, we earn on qualifying purchases.
As an affiliate, we earn on qualifying purchases.
Acoustic Treatment vs. Soundproofing — What Really Works in a Tiny Closet
Understanding the difference between acoustic dampening and soundproofing is crucial for effective room treatment. Acoustic treatment involves adding absorptive materials like foam panels and diffusers to control sound reflections and reduce echo within a space. This improves clarity and reduces muddiness in recordings but doesn’t prevent sound from escaping or entering. For more detailed advice, see how to soundproof a closet.
Soundproofing, on the other hand, involves creating physical barriers—sealing gaps, adding mass, and insulating walls—to block sound transmission. It’s akin to turning a noisy room into a sealed soundproof booth. For instance, sealing a closet door with weatherstripping and adding a heavy blanket or mass-loaded vinyl can significantly reduce sound leakage. These measures prevent noise from disturbing others and reduce external noise interference.
Both strategies are complementary but serve different purposes. Acoustic treatment enhances the internal sound quality, making recordings clearer and more controlled. Soundproofing is about isolating your space from external noise and preventing your noise from bothering others. Relying solely on acoustic panels in a small closet without sealing gaps often results in minimal noise reduction, as sound leaks through cracks and openings. Effective soundproofing requires sealing all potential leaks and adding mass to barriers, whereas acoustic treatment improves the internal acoustic environment.
For deeper insights, see [how to soundproof a closet](https://www.soundproofcow.com/how-to-soundproof-closet/).
ventilated closet for audio rig
As an affiliate, we earn on qualifying purchases.
As an affiliate, we earn on qualifying purchases.
Where to Place Acoustic Panels in Your Closet for Maximum Effect
Placement of acoustic panels is critical because it determines how effectively reflections are controlled. The goal is to treat surfaces that directly influence the sound reaching your microphone, especially those that cause echo, flutter, or bass buildup. For tips on optimal placement, see treating a closet booth.
Start by identifying reflection points—surfaces where sound waves bounce directly back to the mic. A simple mirror trick helps: hold a small mirror along the wall behind and beside your microphone. When you see panels, you’re treating the right spots. These are typically the wall behind the mic, the side walls facing the microphone, and the ceiling.
In tiny closets, parallel walls can cause standing waves and bass buildup, which muddle recordings. Installing bass traps in corners can help tame low-frequency issues, but in very small spaces, broad wall treatment often yields more noticeable results. Covering the primary reflection points reduces echo and improves clarity, while bass traps address low-end rumble.
Optimally, treat the first reflection points thoroughly and add bass trapping in corners. This balanced approach ensures a cleaner, more natural sound without overloading the space with panels, which can deaden sound unnaturally.
Check out this step-by-step guide on [treating a closet booth](https://www.soundassured.com/blogs/blog/turning-a-closet-into-a-vocal-booth).
Common Placement Mistakes That Make Your Closet Sound Worse
Many DIYers unintentionally worsen their acoustic environment by treating the wrong surfaces or neglecting critical gaps. For common mistakes and how to avoid them, see Acoustic Dampening, Placement, and the 'Rig in the Closet' Setup.ng critical gaps. Common mistakes include leaving the closet door untreated, neglecting the floor, or installing panels only on the far walls, leaving reflection points unaddressed.
For instance, a creator covered his walls with foam but left the door open and the floor bare. The sound bounced around freely, creating a boomy, echoey mess that negated the benefits of the panels. This illustrates that surface treatment alone isn’t enough; gaps and untreated surfaces can undermine your efforts.
Another frequent mistake is focusing only on treating corners with bass traps. While bass trapping is important for low-end control, it doesn’t resolve mid and high-frequency reflections that cause muddiness. Prioritizing the reflection points—like the wall behind the mic and the ceiling—has a more immediate impact on clarity.
Seal gaps around the door with weatherstripping, add a thick rug to absorb reflections from the floor, and treat the wall behind the mic to improve overall sound quality. Remember, the goal is to control how sound reflects and leaks, not just to add panels indiscriminately.
DIY Tips for a Budget-Friendly Closet Sound Booth
You don’t need a million-dollar studio to improve your closet’s acoustics. Simple, cost-effective solutions can yield impressive results. Think blankets, foam panels, rugs, and movable curtains—materials that are easy to deploy and remove as needed.
For example, hanging a thick blanket over the door and lining the walls with foam panels from Amazon can drastically reduce echo and sound leakage. Placing a rug on the floor absorbs reflections and reduces boomy resonance, creating a more controlled environment. These DIY treatments are especially effective when placed at reflection points identified through the mirror trick.
Using command hooks and removable mounting tape allows you to experiment with placement without damaging surfaces. Focus on the primary reflection points—behind the mic, the side walls facing the mic, and the ceiling—for maximum impact. This approach offers significant improvements in sound clarity and noise reduction at a fraction of the cost of professional solutions.
Frequently Asked Questions
Is a closet actually good enough for recording vocals or voice-over?
Yes, a closet can work well for vocals and voice-over, especially when treated properly. Small, reflective spaces can be tricky, but with acoustic panels, bass traps, and door sealing, you can achieve broadcast-quality sound.
What is the difference between acoustic treatment and soundproofing?
Acoustic treatment improves how sound behaves inside a space, reducing echo and reflections. Soundproofing prevents sound from leaking in or out by sealing gaps and adding mass. Both are important but serve different purposes.
Where should I place acoustic panels in my closet booth?
Place panels behind the mic, on side walls facing the microphone, and on the ceiling. Focus on reflection points identified with a mirror trick. Bass traps should go in corners if low-end buildup is an issue.
Do I need to treat the corners, or should I focus on walls and the desk first?
Start with treating reflection points on the walls near the mic and the ceiling. Corners matter for bass trapping, but in a tiny closet, treating flat surfaces usually gives the biggest immediate improvement.
Conclusion
Your closet can be a surprisingly effective studio — if you treat it right. The key is moving the noise and heat away from your workspace, then carefully placing and sealing acoustic materials where they do the most good.
Remember: a well-ventilated, properly treated closet rig isn’t just quieter — it’s cooler and more reliable. So, start with distance, then focus on smart placement. That’s how you turn chaos into clarity.